Thursday 19 December 2013

christmas tree

Our Christmas tree is making our living room a very enjoyable place to be these days. Gemütlich. Gezellig.


The red ball I knit from this pattern on ravelry. I kept it simple but would love to try some with a pattern. I changed the number of increases and decreases slightly to fit the ball I was using. 

I made the clay circle at the same time as I made these plates

And the little mushroom is just cute. 

Wednesday 27 November 2013

Neuenheim fabric

The design I was working on of the Neuenheim shoreline is finished and I received the proofs of the fabric in the mail last week. I made two designs, one featuring the shoreline in a tea towel calendar:


and another coordinate fabric with stripes of the shoreline:


Both fabrics are available for sale in my shop


Monday 25 November 2013

another box

Storage space is a bit limited in our new apartment. Since we have quite a few open shelves, and with many boxes left over from moving, I wanted to try to make a few storage boxes. I followed this tutorial.
I love how sturdy the box is (I used double layers of cardboard with the grain going in opposite directions) and also how easy it is to make it exactly the size I need. I have two more in the making but unfortunately no more of the forget-me-not wrapping paper!
The pictures show the step-by-step process.

Wednesday 30 October 2013

boe zegt de koe

About a year ago my aunt blogged about this embroidery that she bought second hand and which she then gave me for my birthday.
I finally framed it today and wanted to share the final result:


Can you spot the difference since I got it? (Hint, it says roekoe).

Whoever embroidered this was amazingly neat, just look at the back! I learned a new technique of cross stitch trying to emulate the technique when I stitched the dove. The design is by Dick Bruna.


Friday 25 October 2013

pumpkin postcard

This month I made pumpkin pie, pumpkin soup and today I enjoyed a bowl of home-made pumpkin ice cream. 


I used this recipe for the ice cream, omitted the raw eggs, and since I don't have an ice cream maker, froze it in the freezer. One small pumpkin is perfect for a good sized container of ice cream. It tastes creamy and delicious with the roasted pumpkin and coconut milk, and I love the crunchy roasted pumpkin seeds on top.

Friday 11 October 2013

Heidelberg

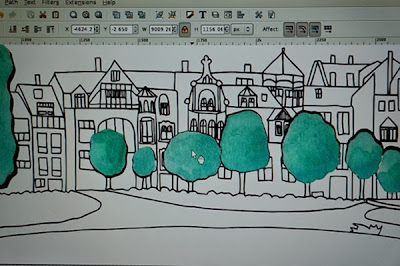
I'm working on a last Heidelberg postcard. We moved from Heidelberg to London, UK at the beginning of August. A new country, new home, new job / work circumstances is not always easy.
I've been working on a design for quite a long time. Usually I don't take this long with one design, but I want to get this one right and make it the way I see it in my head. Its a postcard from Heidelberg in that the design features the houses along the river in Neuenheim. Kind of like these postcards from last October. In fact, that's one of the photos I used as inspiration.
Here's a progress update, since it isn't finished yet, and since I haven't written here for so long. Not quite ready to move on to postcards from London I suppose?


I want to use the design for making fabric, but I also want to use the design in an upcoming spoonflower contest for tea towel calendars. So this evening I'm working on watercolour letters for the month's names. Here's June.


Friday 28 June 2013

lemon tarts

In the midst of thesis madness (one week to go!) I entered this week's contest on spoonflower. The theme is citrus fruits and I decided to draw some lemon tarts. Yellow looks good with turquoise, so they're sitting on plates on a lace table cloth. Here's the design with two coordinates.


I love how the crocheted lace turned out. I've tried to use it in a design before, but this time the repeat worked better. My great aunt crocheted it as a table cloth. I used the table cloth to make this little plate.
Voting has started, so if you like lemony and limy designs, take a look.

Wednesday 12 June 2013

noodle machine

I got a noodle machine for my birthday and tried it out today. Very fun!


Tuesday 11 June 2013

baskets of berries

I had a bit of time last night to design, so I worked on an entry for this week's spoonflower contest with the theme farmer's market. I like the theme, it conjures up images of stacks of vegetables and flowers, sunlight and cheese and coffee (thats what the market close by is like). I decided to draw some little baskets of berries. I usually start with a pencil sketch, then draw the outlines with a pen, erase any pencil lines and take a picture. This is how it looks:


Then I trace the image in inkscape to make it into a vector image, and play with colour and placement. I've also recently starting painting bits of the image in gimp, to give it more texture. This is the final design:


update: you can see the other designs and vote here


Wednesday 5 June 2013

noodles

I recently learned how to make noodles. It really is one of the simplest and fastest recipes!
1 egg, 1/2 cup flour = noodles for one person.


Monday 6 May 2013

inkscape tutorial - put text on a path

This week's contest on spoonflower is birthday-themed wrapping paper. For my entry I used a design I made a few weeks ago but added the text happy birthday. I wanted the text to follow the lines of the vines and flower stems. This tutorial shows how to put text onto a path using inkscape.


1. Write your text, choose the font you want to use and size it so it will fit where you want it to go.

2. draw a path using the bezier curves tool, curving it to follow your line. I first drew the line in black,

3. and then made it invisible (unlike the clip function, with this function you still see the line after you put the text on the path, so if you don't want to see it, make it invisible). Then select the path and your text.

4. Text - Put on path

5. and your text curves to follow the path! If the text doesn't quite fit (it starts at the beginning of the path and gets cut off at the end) you can undo, resize and try again.

6. Basically thats all, but I wanted the text to take the place of the existing lines, so I had to remove the vine where the text was. For that I selected two nodes and clicked on "break path at selected nodes".

7. Then I could move those nodes, do the same at the other end, and delete that section of the vine.

8. The text fits perfectly!

Here's the finished design:


Sunday 5 May 2013

Sunday afternoon


I have a lot of projects simmering in my head that I want to share here. In fact, one of the projects has been spread all over the living room floor the last few days making me feel a bit antsy (I will clean it all up this evening!) But I want to rather share three pictures from right here and now. Sitting on the balcony in the evening sunlight with a big mug of milky tea, my embroidery and a book. It's a nice way to end a rather quiet weekend.

 
Here's a close up of the embroidery. Its a bit kitschy but I like it (others don't :-))


And a glance out across the trees and houses. Its nice to hear bits of activity around me, see people eating supper on their balcony, hear a ball bouncing somewhere and a neighbour listening to the radio.


I haven't planted anything yet this year. I want to buy some flowers this week. The purple ones I got from my neighbour yesterday as a thankyou for watering her plants. The strawberry is back in its fourth year and already has lots of little mini strawberries growing, I'm impressed! I think the rose is also four years old. This winter I didn't cover it but it seems fine. Not like my hydrangeas and lavender which all died. I was surprised to see a forget-me-not plant growing, it also survived the winter.  

Wednesday 17 April 2013

garden tools

On Friday it was suddenly spring in Heidelberg. There was a big rain shower and when I walked out of my office at 3 in the afternoon everything was shiny, green, full of flowers and warm. I've never seen spring arrive so suddenly. Since then it has been warm and sunny and on Sunday we spent all afternoon on the balcony. With bare feet!


Last week's contest on spoonflower had the theme garden tools. When we stay at my parents-in-law's house, we sleep in the garden room full of books about gardening, which is where I got the inspiration for these garden tools. 


I tried a few different designs with different colours. Which do you like better?


Tuesday 16 April 2013

hot water bottle cover

Its almost almost time for no more hot water bottles. So before its too late, here's my new hot water bottle cover. I bought a hot water bottle years ago with a soft red cover. Over the years the polyester covering bothered me more and more so I decided to knit a new cover. I used this pattern I found on ravelry. I had some blue wool from an unfortunate glove adventure as well as some red white and grey from other projects.


Sew it together, fill it with hot water and life is much better.


Tuesday 2 April 2013

Jane Austen chairs

Did you notice the new header? I recently painted these chairs and thought they would look nice here. They were done for a contest on spoonflower, the topic is "living in a Jane Austen novel". They made beautiful chairs in those days! And the nice thing about the computer is that its easy to reupholster a chair just by changing the colour of the fabric. I painted four chairs in different colours but decided the whole design looks better in one colour.

postcards from heidelberg

You can see the other designs from the contest and vote for your favourite until tomorrow! 
update: this fabric is now for sale here.

Tuesday 26 March 2013

some little boxes

Last week I finally had an idea for what to make with some wrapping paper I bought a long time ago that has been sitting on my desk. Little boxes! I love little boxes. These were constructed with thick paper, covered with the forget-me-not wrapping paper and stabilised with thick matting board.


I put eyelets in and added a little ribbon as a pull.


the finished box


which is a drawer. I got a bit lazy after making two and noticed that two cadbury tin boxes I have fit perfectly. The outside bit of the drawers I made out of a box we got as a gift box for Christmas. I only needed to turn the lid into a side, add some prop-ups to hold up the middle bit and glue some sides down.


I've noticed while writing that explaining the process isn't as easy as just doing it! So hope at least the pictures inspire you to make one too. I have one of those wooden small set of drawers and wanted to get another, but now didn't have to buy one, plus its a lot nicer!

Thursday 21 March 2013

painted easter eggs


Its finally officially spring, so time to take down the paper snowflakes and hang up the easter eggs, even though there is still snow on the roof.

 Martin's grandmother painted these beautiful eggs. This is three views of the same egg. Don't you love the little bear family?

This week's spoonflower contest is painted eggs. I took a picture of each egg and arranged them into a scattered repeating design to print on cloth.


You can see all the other entries and vote in the contest here if you want :)

Tuesday 19 March 2013

more macarons

A few weeks ago I wrote about the macarons I tried from the french bakery around the corner. They were so good that I wanted to make some myself. I used this recipe, and like it promises, if you follow the recipe exactly it will work! (Although I have to add that I eye-balled 36 grams, as my scale isn't digital, so it might have been 38 or 39 grams, but that should be encouraging rather than discouraging, if you want to try the recipe. Also, it only made half the amount of macarons, for some reason.)


I didn't add any food-colouring, which I will do next time. It was a lot of work, but not too hard. Basically its very important to sieve and sieve until the almonds are very fine. I put them in the blender, sieved, blended, sieved, and in the end threw away about 2 tablespoons that I couldn't get fine enough. Another helpful tip is to draw circles on the baking paper sheet to make it easier to make each macaron the same size.

For the filling I made a ganache and tried two flavours, using capuccino chocolate and white chocolate (1 part chocolate to 1 part cream, heat the cream, add the chocolate and stir until melted, let cool and then whip) :


I still have a few in the fridge, so if you want to try one, come for coffee!


Friday 15 March 2013

inkscape snowflake tutorial


A few months ago I created a snowflake design for a contest on spoonflower. I had lots of fun making the snowflakes with inkscape. Here's a tutorial for how to do it. Three important shortcuts: Ctrl+L simplifies the path, Ctrl+D duplicates a selected object, Ctrl+G groups selected objects.

1. draw a six-sided polygon with the "create stars and polygons" tool.
2. draw three lines and group them, this will be a guide for making the snowflake. (you can delete the polygon now if you want)
3. with the pencil tool draw a shape, any shape works! experiment with the effect of different shapes.

4. the shape will be quite rough, so clean up the lines by clicking Ctrl+L a number of times until the line is smooth.
5. duplicate (Ctrl+D) and mirror the object (V and H for vertical and horizontal mirroring), using the lines as a guide.
6. group (Ctrl+G) the two objects.


7. duplicate this object, mirror again,
8. and place it opposite, again using the lines as a guide.
9. now fill the shape with colour and delete the black outline. Group again


10. now comes the fun bit: duplicate and rotate (it should rotate around the centre, so no need to move it). Do this twice, using the lines as a guide. Delete the guide lines and your snowflake is done!
11. you can play around with opacity to get different effects.


You can use the same shape starting out in a different position to make another snowflake, or draw another shape. Try different levels of opacity and different sizes and colours. This is what I came up with, a repeating pattern for printing on cloth:


ps. here's a similar tutorial that inspired me by Byteweiser

Update: This pattern is now available for sale on gift wrap, wallpaper and fabric in my shop!

Wednesday 13 March 2013

coffee steam

I love the steam from freshly brewed coffee in the sun. It changes so quickly and creates such beautiful swirls and twirls.


And here's a coffee postcard. To show how a blurry banana tree in the background can add some tropical warmth to a sombre day.


Tuesday 12 March 2013

finished sweater

Last week we had the first promise of spring - flowers coming up everywhere and leaves coming out, all within a day or two. Today it's been snowing again, so maybe its okay to post about a woolen winter sweater.


I finally finished this sweater last week. I started it in 2003 or 4, I'm not quite sure. I was visiting my grandmother and like so often we were talking about making things. I had never knit anything big before but wanted to try to knit a sweater. Well, she had wool, from a knit dress her sister had made that she had unravelled, and she washed it and rolled it into balls for me. A pattern? You don't need one, just measure and make it up yourself! So I did, I wanted a V-neck, not too loose sweater with long sleeves. And after 10 years its finally done. 

My mother just sent me this picture of the two of us knitting (I'm working on snorri here). Its interesting to see how we hold the needles. I learned knitting from my mother who learned it from her mother. And when she taught me I remember that it was the dutch way of knitting, as opposed to the way my canadian family knits.


Monday 4 March 2013

macarons

I had macarons for the first time a few weeks ago. From the French bakery around the corner. I was surprised at how good they taste! For some reason I always assumed they were dry and crunchy, but they're not, they're chewy and delicious. These were filled with a coffee cream.


Saturday 2 March 2013

how to clip a design with inkscape

I use inkscape a lot, either for drawing figures for my thesis, or for designing fabric. Last year my brother taught me how to clip an image and in this tutorial I want to show you how I used that function in one of my designs.

This was a design for one of the weekly contests at spoonflower with the theme Australian animals. I started by sketching a number of different animals, scanning the sketches, cleaning up the lines and converting them to paths. Then I drew the eucalyptus leaves and pods, duplicated and arranged them until I had enough to fill the area of the animals. This tutorial shows how I clip the eucalyptus leaves into the shape of the kookaburra.


1. The kookaburra needs to be a path (I used the Path->Trace to bitmat function to convert it into a path), make sure the image you are clipping is big enough to fill the shape of the kookaburra. I moved the leaves and pods around a bit to make sure I included smaller parts like toes and the beak. 

2. Place the outline over the image and select both. Then comes the fun bit: Object->Clip->Set.

3. The path disappears and the image is clipped to the shape of the path.

4. I added a background colour (again, clipping the grey colour with the outline of the kookaburra)

5. The finished design!