Tuesday, 16 December 2014

how to wallpaper a dollhouse

I'm making progress on my dollhouse renovation. I love the exterior paint colours and have been slowly building up layers of white paint inside to cover all the colours. Here are some work in progress shots. As you can see, there is a lot of bright paint to cover! One of the first things I did was remove the plexiglass windows which were dark and covered in paint. Then there was a lot of sanding and scraping and cleaning to do.


Yesterday, after a third layer of white paint that didn't cover the bright green on the upstairs walls, I decided to try wallpaper. Here are some pictures of the process and some tips if you want to try it yourself!


0. Choose some paper! I went to a few stores looking at wrapping paper before I found this paper in Flow magazine (it was a good excuse to buy the magazine as well, which I love).

1. Make a paper template of the area you want to cover, especially if there are windows involved. I have little window sills that needed to poke through the paper. Very important: measure at least three times before you cut the actual paper!

2. Cut out your paper template,

3. and try it on the wall. If you look closely, you can see that there is some wall showing through at the top of the window, so I adjusted my template accordingly. If you measure correctly, then cutting the actual wallpaper should go smoothly.

4. Cut the wallpaper. I used a quilters ruler as a guide to make sure everything was perfectly straight and squared up.

5. Try it on inside the walls. My paper didn't fit all the way around both walls, so its important to make a fold on one paper to go around the corner and start the other paper in the corner on top of the folded paper, so there is no gap.

6. Using your template, cut out the windows and window sills.

7. Another way to make sure the windows are positioned correctly is to place the paper inside, and mark the back with a pencil, especially if the corners of your windows are not completely square.

8. Once the paper is cut out, I used modge podge glue to attach it. This meant working quickly, putting down a layer of glue and smoothing it out with an old drivers license and then putting more modge podge on top to act as a varnish, that is especially important around the windows so that the paper doesn't tear when it is handled.

9. The finished room! And because I was so motivated, I right away laid the floor upstairs. I'll post a tutorial another time.

I'm very happy with how it turned out, and am thinking about whether I want to wallpaper downstairs as well (the white paint did a better job of covering downstairs, so it isn't strictly necessary). If I had had the time though, I would have gotten a wallpaper swatch from my spoonflower shop. The swatches are only $5 and are 12 x 24", so would have been the perfect size for the wall. Since they are peel and stick, I wouldn't have had to mess about with glue. So if you want to try this project, head over to my shop and buy a swatch of peel and stick wallpaper :-)

Here's a shot of the dollhouse how it looks now. You can see the exterior paint colours and the floor as well as the two different papers I used as wallpaper upstairs.


Thursday, 11 December 2014

christmas tree

On the weekend we put up our christmas tree. We have it in the bay window which takes up some of the precious light these days, but since the sun goes behind the houses at quarter past three, it doesn't really matter. 


The last three years I've made different kinds of ornaments each year. Last year I knit these baubles, the others will have to be another blog post! This year I made felt ornaments as part of my preparation for teaching a felt craft evening. I love the little dala horse. It was kind of a make-up-as-you-go thing, so I'd like to make another and think it through a bit more.


Monday, 1 December 2014

dollhouse renovation

I found a dollhouse! Carried it home and have been sanding, filling in holes and now painting. Here are some pictures from before I started renovating:


And now I'll get started on the second coat of paint. Its going to be white inside (bone china to be precise) with white trim outside and dark (breton) blue.

ps. today there is another free shipping day in my spoonflower shop, for 12 hours only!


Wednesday, 26 November 2014

moo cards

Look what came in the mail today! I ordered some cards from moo and love them. Good quality thick paper, colours exactly what I expected and I love the little details in the way everything was packaged. They're going to be presents, so I hope the wrong people are reading this!


Friday, 21 November 2014

advent wreath

The felt craft evening was fun and I'm looking forward to the next one in two weeks. This time I want to do a mini felt advent wreath and am working on the tutorial. I love the tiny candle flames.


Monday, 17 November 2014

more autumn berries

Some more finds from my walks around the neighbourhood.


I had fun arranging this on a piece of paper and then turned them into a fabric design: sketching, digitizing, arranging and coloring. Just love the process.


Friday, 14 November 2014

felt christmas bauble tutorial

I've had a lot of fun the last few weeks playing with felt and creating some felt ornaments in preparation for teaching a craft evening. For those who attended the evening - welcome! - here is a step by step pdf tutorial for the christmas bauble with photos. For anyone else - enjoy the tutorial and I'd love to see what you made.

Tuesday, 11 November 2014

tea towel calendar and a sale

Every year at around this time spoonflower has a contest for tea towel calendars. This year the contest was followed by a sale where you can buy two fat quarters for the price of one. The sale is on for one more day! The last two years I've made tea towel calendars (2013, 2014, which I need to update to 2015!). This year I used elements from my most recent collection. I love the details of the leaves :-)
The tea towels are scaled to fit on one fat quarter of linen cotton canvas, which has different dimensions than some of the other fabrics.


Saturday, 8 November 2014

fabric swatches

A few days ago I got a package with fabric swatches (always so exciting :-)). Here is my new collection in two different colourways:


I've now set them for sale in my shop. I'd love to try this one as wallpaper. What do you think?


Thursday, 16 October 2014

autumn inspiration

I go for a walk or two a day with my daughter around the block. Today I looked for berries and flowers in all the colours of the rainbow. I love all the little things you see when you take the time to look.


Thursday, 9 October 2014

tutorial - shifting an object in inkscape

I've been using inkscape for years and what I love about it is that I keep discovering new things it can do. I suppose that could be something that bugs me, since the user interface can be quite overwhelming to figure out, especially when you're starting out, but I like the feeling that there are all kinds of possibilities I don't know about. Yesterday I found the move function under transform (Object - transform, or Shift+Ctrl+M). What this does is move an object a certain number of pixels either vertically or horizontally.


In fabric design this is something I do all the time in order to create a repeating pattern. Until now I've been using a more convoluted method: placing an object at 0 on the x or y axis, duplicating, then moving the second object along the x or y axis depending on the width and height of the page, grouping the two and placing them where I want on the page (it sounds more complicated than it is, but its a lot of extra steps compared to using the move function).

You can see how easy it is to move the whole group of girls in the design below to quickly see how the pattern looks in repeat. Group them all, duplicate and move horizontally the number of pixels of my page width. 


The design I've been working on this week is once again for the spoonflower design contest. This week's theme is umbrellas, and I reworked some of the girls from this design, added a few more and played with colour and placement. 

You can see the final design in my shop (not yet for sale) and see the other designs in the contest here (voting starts this evening). 

Now I'm looking forward to trying out the different options of the transform tool and hopefully discovering other functions I didn't know about. 


Tuesday, 30 September 2014

high chair cover

I bought a used tripp trapp high chair a few months ago. Rather than buy a cushion for it I decided to design and sew one myself. Now we'll just see how often it needs to be washed!

Sunday, 28 September 2014

creating a fabric collection

A few weeks ago I took an online course on pattern design at creativelive. Even though the course focussed on using adobe illustrator to create fabric designs and I use inkscape, I found it very helpful and learned a lot. Part of the course was learning how to create a collection and there was a design competition hosted by the teacher, Bonnie Christine, to create a fabric collection and document the process. It took me about two weeks to create the collection and I enjoyed really thinking through how different designs work together, coming up with a colour palette, and playing with different ideas for designs. I documented the whole process here, but here are a few details:


And here is the final collection:


I also enjoyed coming up with a title for the collection and names for each design. Usually its a bit of a challenge to come up with a good name for a design. Thinking of the designs as part of a collection helped!

Following through until a collection really feels done is a lot more work than I often put into designs, but its definitely worth it and makes me want to revisit some of my earlier designs and collections to give them a final polish. The designs will soon be available for sale as fabric, wallpaper and paper in my shop.


One of the things I'm inspired to do with further designs is to spend more time on the brainstorming and sketching stage. It really helped to spend a few days letting ideas grow, trying out different options and colours and giving them time to settle and mature.

Monday, 1 September 2014

inkscape tutorial - simplify paths

Here's a very small tutorial showing something I use quite a bit when designing with inkscape. When I scan a drawing and then use the trace function in inkscape to convert the lines to vectors, the lines are often quite bumpy. Sometimes that's fine, but often I want smoother lines, and more importantly, I want less nodes on the path so that its easier to clean up and edit.


Step one: select the object, making sure you have the "edit path by nodes" button activated, so that you can see all the nodes.

Step two: path - simplify, or Ctrl + L

Step three: this reduces the number of nodes while keeping the shape of the object basically the same.

Step four: zoom in and tweak the remaining nodes until the object is the shape you want.

Two things I've noticed while doing this: 

If you select a number of objects and try to simplify them at the same time it doesn't work nearly as well. The paths end up looking like an abstract mess. However, if you just select one object at a time, the shape stays basically the same. You do have to be careful though, since sometimes this will delete so many nodes that your object changes shape drastically. 

When I scan a drawing to convert it to vectors in inkscape, it helps a lot if I first slightly blur the picture before performing the trace in inkscape. This smooths the lines before the actual trace, meaning there is less clean up / simplification of paths needed and also results in smaller, easier to handle files.

ps. the examples are from a new design I'm working on (yes, thats me reading a book in my living room)


Friday, 8 August 2014

beetles and blackberries

Last weekend we went on an outing to Beddington Park and saw lots of ripe blackberries. I didn't have a container along to pick any, but took a photo instead and inspiration for a new design.


I know the japanese beetles in the design are a bit strange, but I decided to add them so that I can enter this design in next weeks spoonflower contest (topic: beetles) and will make a version without beetles.


Wednesday, 6 August 2014

sourdough bread

When I come home from visiting family I usually feel strange and disjointed for a few days. In July I spent three weeks in Canada and before I left I made a list of things I was looking forward to doing at home so that when I came back I could blindly follow the things on my list until I felt normal again.
One thing I've been wanting to try for a while is sourdough. I used this recipe for a starter and after a few days I was ready to try my first loaf. The first and second attempt didn't work very well, but the third, fourth and fifth have been amazing.


I love how the parchment paper turned golden to match the bread.


Saturday, 28 June 2014

faux suede

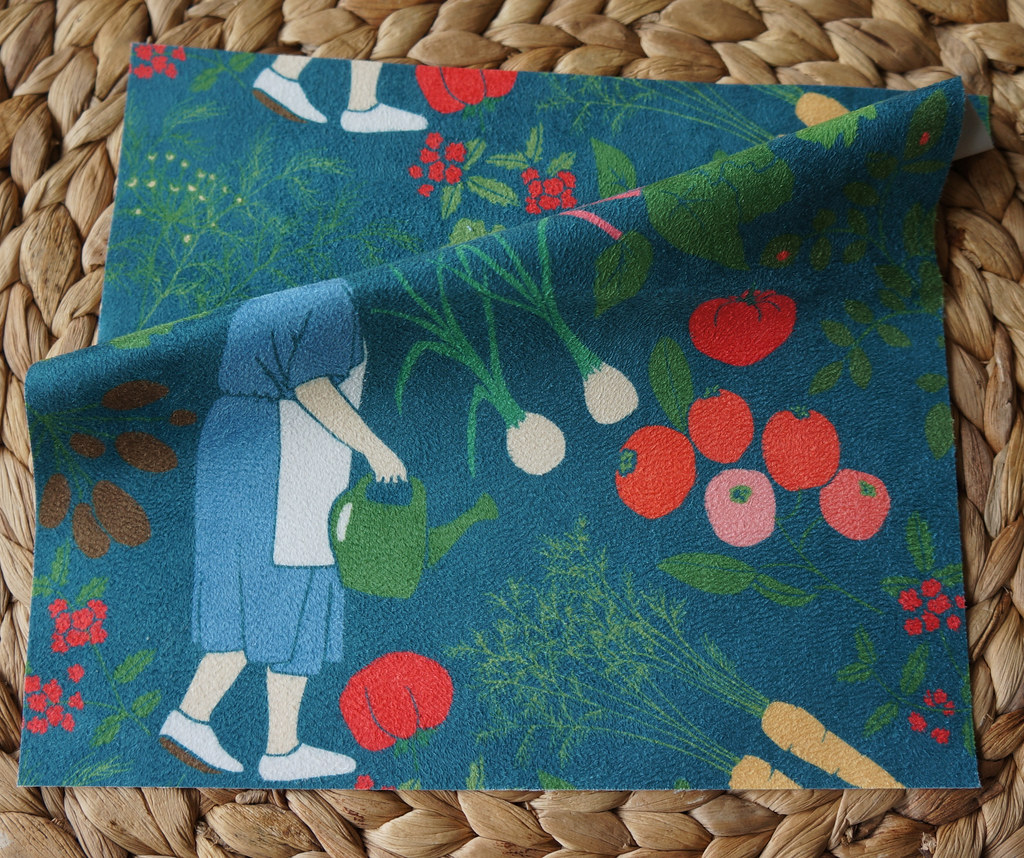
The latest fabric added to the line of fabrics my designs are available on is faux suede. I ordered a swatch and really like the quality of the fabric. Its thick and would be suitable for upholstery or for sewing bags or pillows. The colours printed very well and also very densely, there is no white showing through anywhere. Its quite stiff and apparently gets softer with washing. 
The design I had printed is available for sale here
And in case you're wondering why I folded it so the head isn't showing, I reworked the original design since ordering the fabric, because the head looked very strange!

Sunday, 22 June 2014

garden

My grandma had a huge garden and whenever I visited her I loved to roam through it, randomly picking raspberries and rhubarb stalks, smelling the lilacs and trying the crabapples. These designs feature plants from my grandma's garden and drawing each plant evoked memories and smells and tastes.


I entered one of them in this week's spoonflower contest. Its so much fun when a design starts to come together.

Wednesday, 21 May 2014

terrariums

Terrarium is a nice word isn't it.

I had a baby 7 weeks ago, life has changed a lot!

Last week I sat for an hour in a café sketching the little glass jars holding sugar cubes. At home I reworked the sketches...


... and created little terrariums filled with fabric flowers. The finished fabric design:


ps. its a bit sad what saving as a .jpg does to the image quality..

Tuesday, 4 March 2014

work in progress

Inspiration finally struck for the "women's day toile" fabric design contest this week. 


The design brief from the spoonflower website:

"Women's Day Toile: Toile de Jouy is a type of design popularized in the 18th century that typically depicts a complex scene, often pastoral, arranged into a repeating pattern. Classical toiles are usually two colors, with white or off-white as the background color and the pattern printed in black, dark blue, or red. For this contest, we're asking designers to come up with a toile de Jouy that celebrates remarkable female scientists, inventors, and leaders. Previews will be sized as quarter yards (21" x 18"). Deadline for entry is Tuesday, February 25th, 2014."

I've never designed toile de jouy fabric before, but once it started coming together, I really enjoyed the different type of design. You can see the finished fabric here and the other designs in the contest here.

Friday, 14 February 2014

A sophisticated snorri

Remember snorri? I had three balls of wool left over from that knitting project and wanted to make a matching baby sweater.
There are many free knitting patterns on Ravelry and one I've had my eye on for a while is a cardigan called baby sophisticate by Linden Down. Its a wonderful straightforward raglan sweater for babys. The snorri pattern has three different cables and I placed these down the back, front and along the sleeves. Adding cables definitely changes the sizing of the sweater - making it quite a bit smaller and tighter. But as usual, steaming and blocking works wonders! The buttons are from my great aunt.


Thursday, 13 February 2014

a postcard from Gloucester

Two weeks ago I went to Gloucester for the weekend. Three and a half hours on the bus aren't so bad when you sit in the front seat.

Two things I enjoyed there:

Exploring the cathedral


The Tailor of Gloucester Museum


Wednesday, 29 January 2014

Frogging

Frogging in knitting may sound really nice but its not. It means ripping out your knitting because you've discovered a mistake many many rows back. Usually I try to avoid frogging at all costs: either talking myself into being able to live with a mistake in the knitting (no one else will notice right?!) or giving up on the project and leaving it for years. 

frogging by karinka_kf

With this project I have gotten far enough that I don't want to give up. I also know that living with the mistake is not really an option. The panel on the right is the front of the sweater - do you notice anything missing? I was concentrating so hard on the windmill design that I completely forgot to decrease for the armholes and also completely forgot to create a neckline. The arms I might get away with, but no neckline might be a bit uncomfortable! So after a few months of leaving it on the back shelf, I finally frogged it and am in the process of reknitting.

Friday, 3 January 2014

create your own pattern fill using inkscape and gimp

This week on spoonflower there is a contest to create a cheater quilt. A cheater quilt looks like a pieced quilt but consists of only one piece of fabric, meaning you can skip the piecing and create a cheater quilt by just quilting.

After I designed the quilt block, I needed to fill the pattern with different fabric designs - making it look like a pieced quilt. The contest came with a colour palette and a theme (spring floral). I have quite a few fabric designs featuring flowers and wanted to use some of them to create the quilt. However, I had a hard time figuring out how to fill the pattern with those fabric designs in a way that looked like a pieced quilt.

I finally figured out that it's possible to use your own pattern with the bucket fill tool in Gimp. This tutorial shows how its done.


Step 1: Open your file, this should be a repeating pattern already. Steps 1-3 here are done in Inkscape, but could also be done in Gimp. 
Step 2: Since I needed to use a preset palette I selected all the objects of one colour, grouped them together and then played around with different colour combinations. Grouping the objects of one colour makes it easier to create a number of different colour combinations.
Step 3: Save your file as .png and open again in Gimp (again, these three steps could be done in Gimp, but I prefer working with .svg files, especially when changing colours.)
Step 4: I usually made the file a bit smaller, so that the bucket fill looked better on the finished design. Export the file as a gimp pattern file (.pat), then move that file to the pattern folder. On a mac using Gimp 2.8 the pattern folder is located here: Library - Application Support - Gimp - Gimp 2.8 - patterns. Then just restart Gimp and the pattern will show up in your toolbox.
Step 5: Select bucket fill - pattern fill and choose the pattern from the list.
Step 6: Fill! You should have a seamless repeating pattern. (Extra tip: Sometimes you might want to fill two adjacent areas with the same pattern, but make it look like fabric, where the repeat would not continue across the two objects. For that I created two patterns which are mirror images of each other.)

Here is the completed cheater quilt, with paper pieced and appliquéd tulips.


You can see the fabric here and the coordinating fabrics here

update: The contest is now open for voting, visit here to see the other designs and vote for your favourite.


Wednesday, 1 January 2014

poinsettia

Happy new year!
For Christmas I made some handmade gifts and now that they've been given, I can share some pictures. This one was especially fun to make, since it was the first time I've designed a paper pieced quilt pattern. I've done paper pieced quilting before and love the possibility it gives for tiny precise lines. Inspired by our poinsettia I made this one. The machine quilting pulls it together and now that I've tried it I want to tweak the pattern a bit more (there are still too many tiny bits and pieces!) and maybe even write a tutorial for it. If you've paper pieced before, you'll know that the quilt is made up of bigger blocks. I think one of the challenges of designing the pattern is to make a few larger blocks rather than many smaller ones.